> For the complete documentation index, see [llms.txt](https://docs.omnileads.net/llms.txt). Markdown versions of documentation pages are available by appending `.md` to page URLs; this page is available as [Markdown](https://docs.omnileads.net/english/contact-campaigns/inbound-campaign/time-range-conditioned-routing.md).
# Time range conditioned routing
## Time range conditioned routing
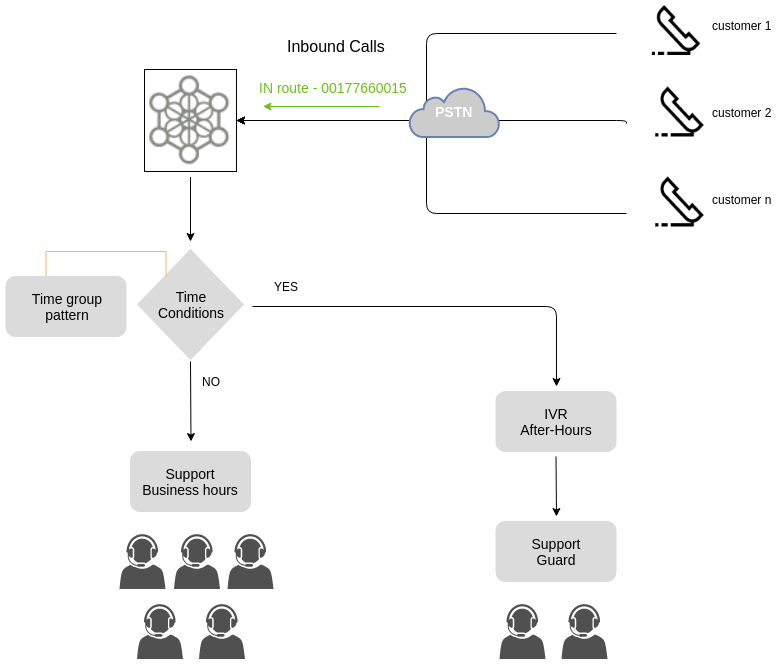
In this section, we work with the concept of Time-based Inbound Call Routing to configure the flow of incoming calls to different internal destinations by comparing the date/time when a call arrives and a related pattern (of dates and times), so that we can plan in advance whether a call should go to one destination or another based on the result of this comparison. For example, a call could go to an inbound campaign within the customer service date and time range and to an IVR that plays an announcement about the service hours when the call comes in outside of this defined range.
Figure 1: Time condition There are 2 modules that work together and allow implementing this type of configuration, which are detailed below.
### Time Groups
This module allows you to group date and time patterns as an object, so that they can then be invoked by time conditional objects. To define or edit time groups, you must access the Resources -> Time Groups menu. To add a new group, press the "New" button. The time groups screen is shown in the following figure:
Figure 2: Time groups Once the time groups have been generated, we can invoke them from the Time Validations add-on module.
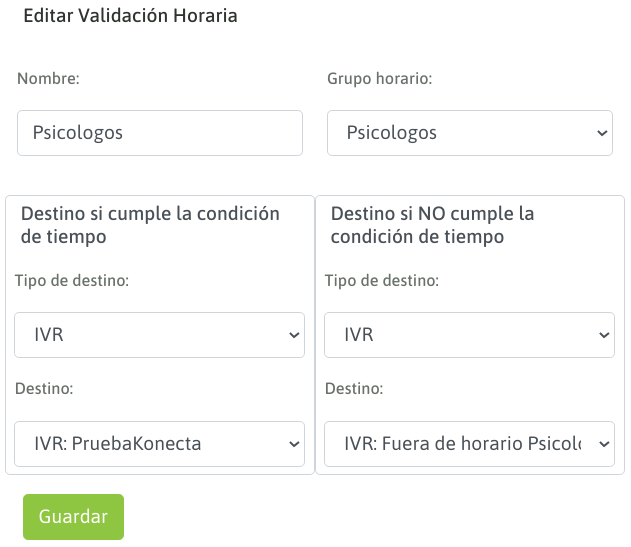
### Time validations
This module allows you to compare the date and time at the time of processing a call, with a time group assigned as a comparison pattern. Then, based on whether or not it matches any date/time range in the group, the call is sent to the positive or negative destination of the comparison.
A conditional node of this class can be invoked by other nodes:
* Inbound Routes
* IVR Options
* Inbound campaign Failover
* Others
To generate a time-conditional element, you must access the Telephony -> Time Validations menu. The configuration screen is similar to the following figure:
Figure 3: Time validations Finally, we have this routing element available to be used, for example, as a destination for an incoming route.
---
# Agent Instructions
This documentation is published with GitBook. GitBook is the documentation platform designed so that both humans and AI agents can read, navigate, and reason over technical content effectively. Learn more at gitbook.com.
## Querying This Documentation
If you need additional information that is not directly available in this page, you can query the documentation dynamically by asking a question.
Perform an HTTP GET request on the current page URL with the `ask` query parameter, and the optional `goal` query parameter:
```
GET https://docs.omnileads.net/english/contact-campaigns/inbound-campaign/time-range-conditioned-routing.md?ask=&goal=
```
`ask` is the immediate question: it should be specific, self-contained, and written in natural language.
`goal` is optional and describes the broader end goal you are ultimately trying to accomplish on behalf of the user. GitBook uses it to tailor the answer towards what is most useful for that goal.
The response will contain a direct answer to the question and relevant excerpts and sources from the documentation.
Use this mechanism when the answer is not explicitly present in the current page, you need clarification or additional context, or you want to retrieve related documentation sections.