Interaction from OMniLeads to CRM
Interaction from OMniLeads to CRM
Each campaign can invoke a particular CRM or view
OMniLeads will trigger calls or notifications to the CRM when an agent triggers a call within a campaign that has been configured to trigger a specific URL to an external CRM. This can occur in inbound, preview, or predictive dialer campaigns.

Figure 1: campaign calls and crm
The idea behind this interaction is to give the agent a view of the called contact in the CRM. OMniLeads allows this CRM URL invocation to involve call parameters, contact parameters, and/or custom parameters within the context of the campaign that executes the call to the CRM.
In turn, depending on the configuration applied in the campaign, the result of the invoked URL can be embedded within the agent console, a new tab can be triggered in the browser for each call, or simply send an HTTP-Post JSON to the CRM.
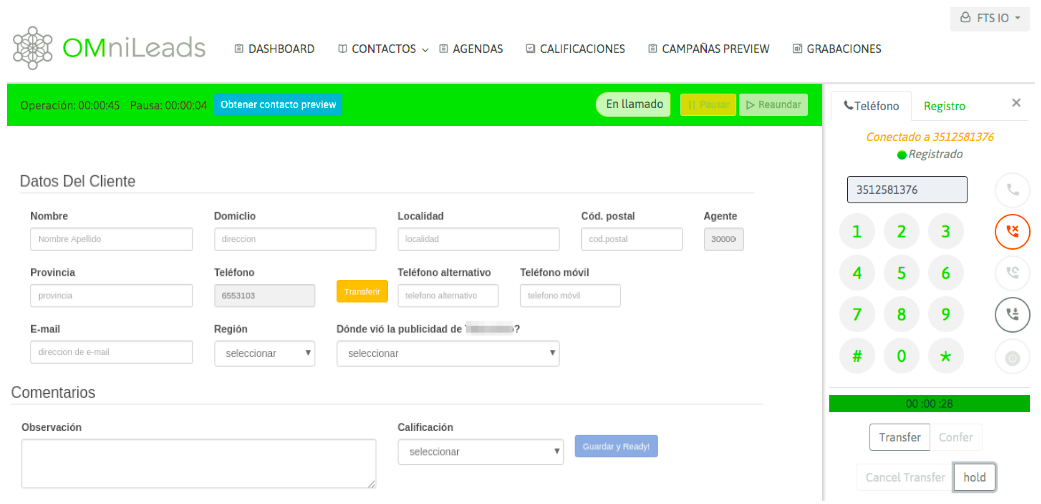
Figure 2: CRM and agent console
Finally, we must consider that the execution of the CRM URL by OMniLeads can be automatic (i.e. at the time the call is generated) or triggered by the agent by pressing a button that triggers the invocation to the CRM. All configuration details associated with this integration scenario are covered within this section.
Activate a new CRM
The first step is to register the "External CRM" entity with its web address (URL) and other settings related to the interaction format you wish to perform. Then you must access the menu item: Campaigns->External Sites->New.
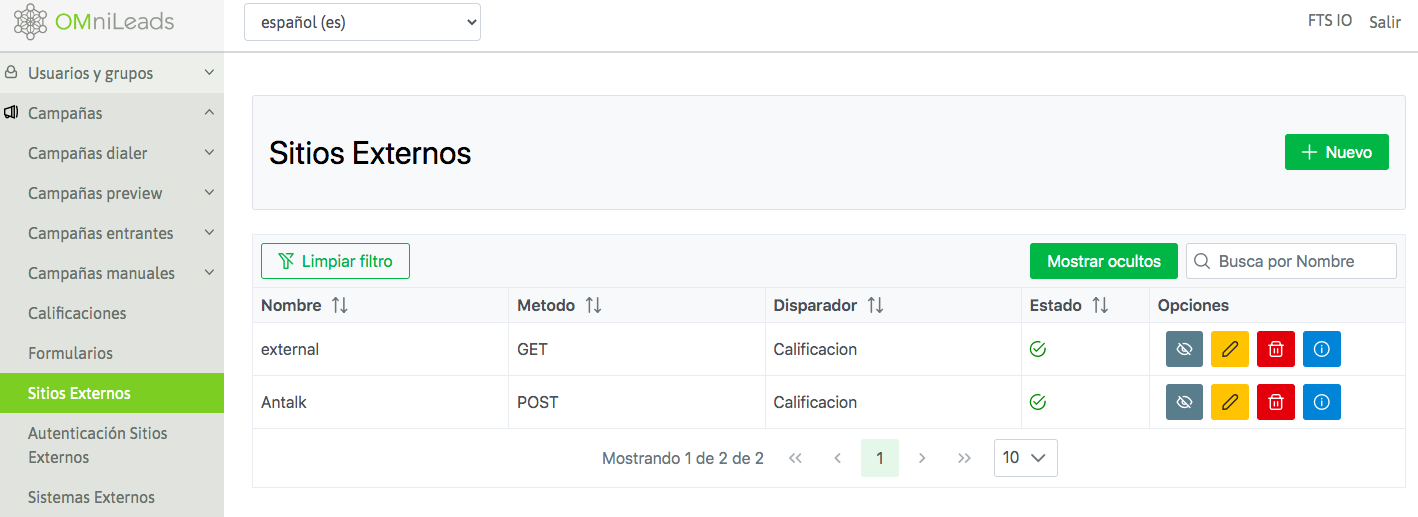
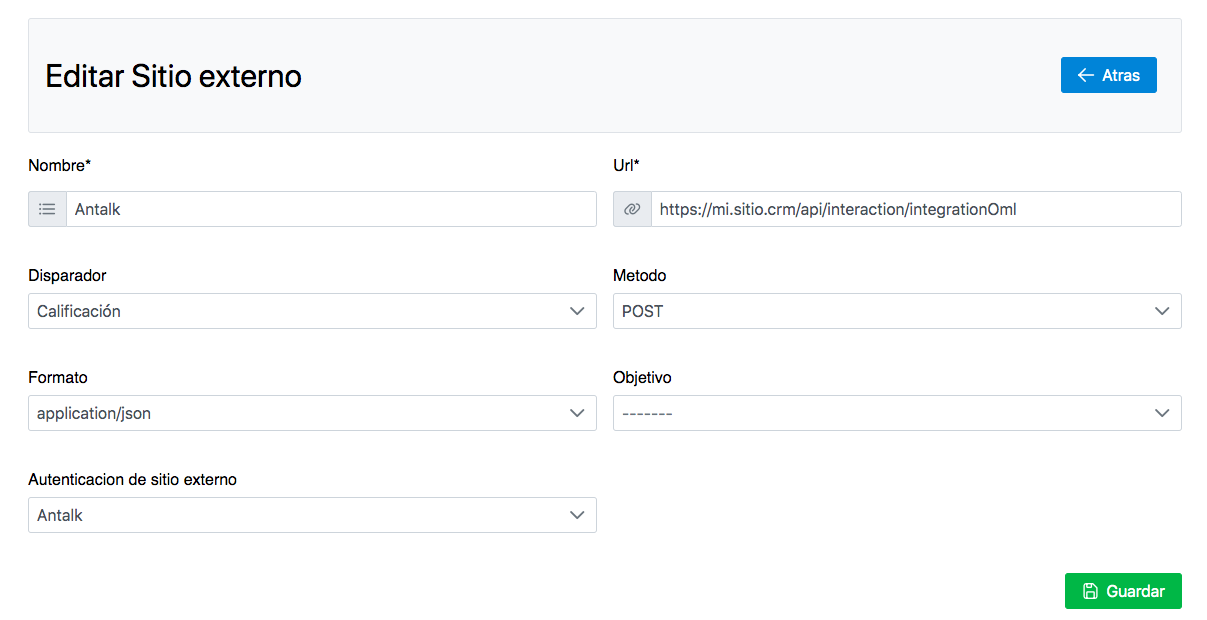
Figure 3: new crm
As shown in Figure 3, in this step we simply need to name the resource, indicate the URL of the resource that must then be invoked from each call within a campaign, the type of interaction (GET, Post or JSON) with which it will be invoked and finally indicate whether the system should open a new tab in the browser, make the request and embed the result within the agent console or send a notification (JSON) to the CRM with the parameters of each new call connected to the agent.
Let's list each field of the form (figure 2):
Name: Reference name
URL: This is the web address to be invoked in each call. Here we only declare the web resource to be invoked. As we will see later, the parameters are customized in each campaign.
Trigger: This allows you to select how the CRM web URL will be invoked.
We select “Agent” if we select this option then when the call connects with an agent, this is the one who triggers the execution of the CRM URL through an Ajax request from the browser.
We select “Automatic” if we want the CRM URL to be executed when the call enters the agent console through an Ajax request from the browser.
Select “Server” if you want an HTTP Post request to be generated to the CRM.
Method: The CRM URL can be executed through GET or POST type requests.
Format: if executing an HTTP-POST type request, the html format can be indicated.
Objective: If the "trigger" is Automatic or Agent, then the result of the request made to the CRM URL can be displayed either "embedded" in the agent console or by opening a new "tab" in the agent browser.
External Site Authentication: When using HTTP standards, it is a mandatory security requirement to have an authentication method based on Endpoint access credentials and Session Secret Rotation Tokens. This option can be configured from Campaigns->External Site Authentication:
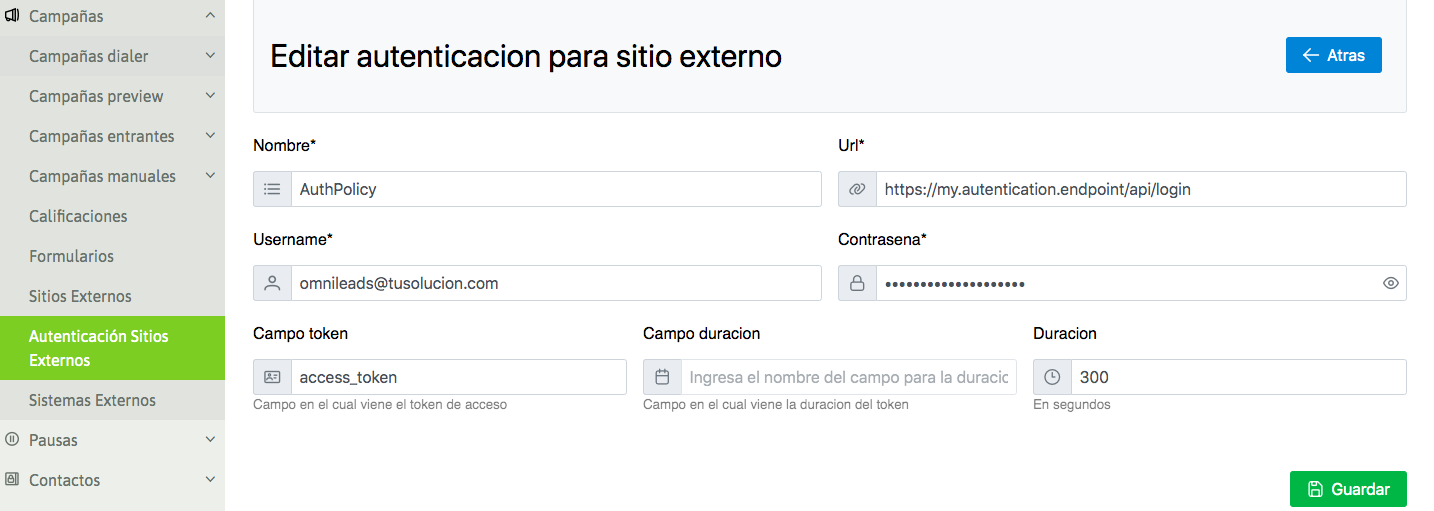
Once the CRM has been generated with its configuration parameters, we can assign it to different campaigns so that they invoke the CRM in each call connected to an agent.
Setting up telephone campaigns with CRM interaction
The four types of OMniLeads campaigns allow you to trigger the execution of a CRM call for each connected call to an agent. At this point we will exemplify how to carry out this configuration in the campaign creation wizard (figure 3).
All campaigns have the possibility of indicating that they trigger a form, an external CRM, or both elements when transacting a call with an agent. In this configuration you can indicate that a CRM should be executed and then indicate the particular CRM that you want to trigger from your campaign.
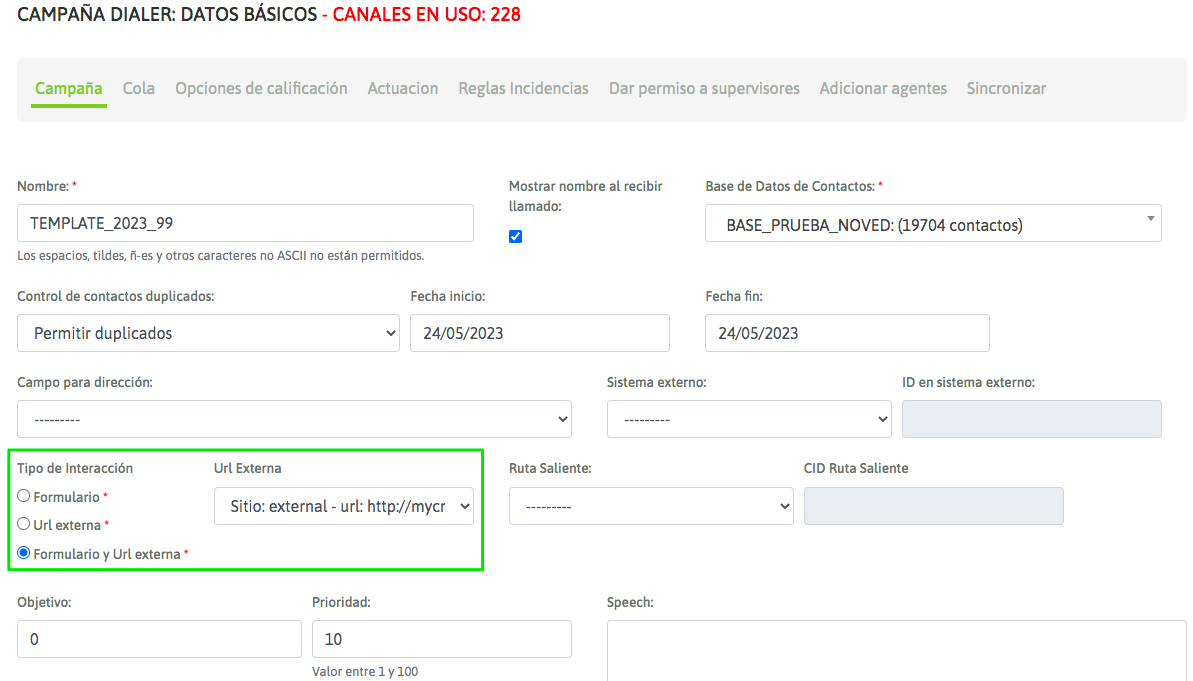
Figure 4: CRM campaign activate
It is important to mention that OMniLeads has the ability to transact with a CRM based on the criteria of its rating. This means that any rating selected that contains the "Interaction with CRM" option checked will trigger the external URL configured in the Wizard as soon as the agent rates the contact. This URL triggered for the occasion will send to the External CRM a set of variables parameterized according to the rules and requirements of the business.
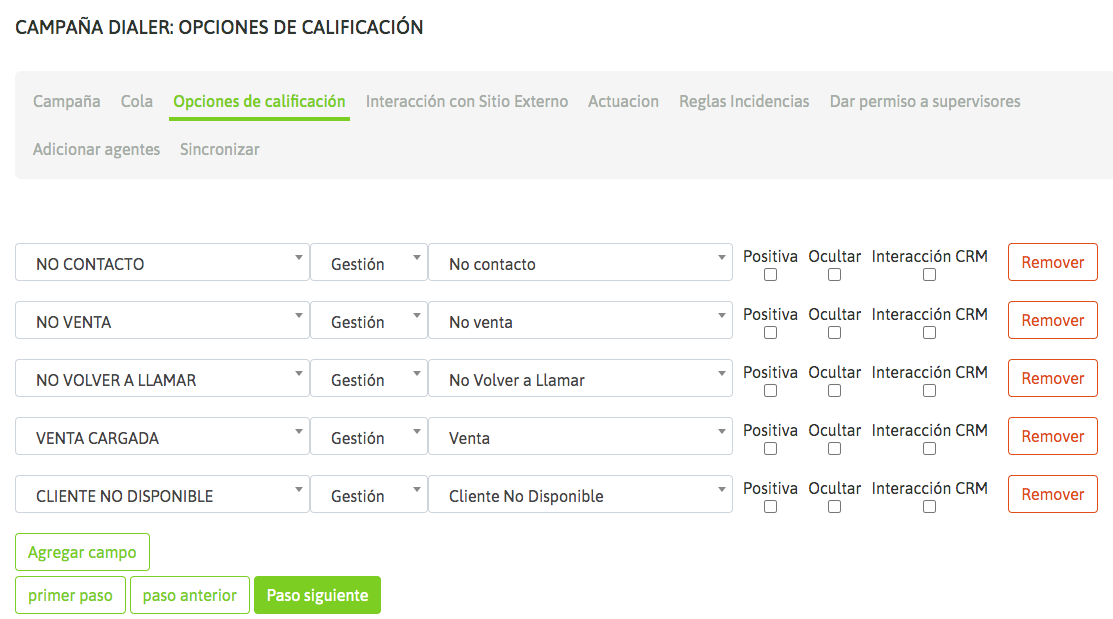
Next, the parameters to be sent to the CRM must be assigned. This is also established within the configuration of a campaign (figure 5).
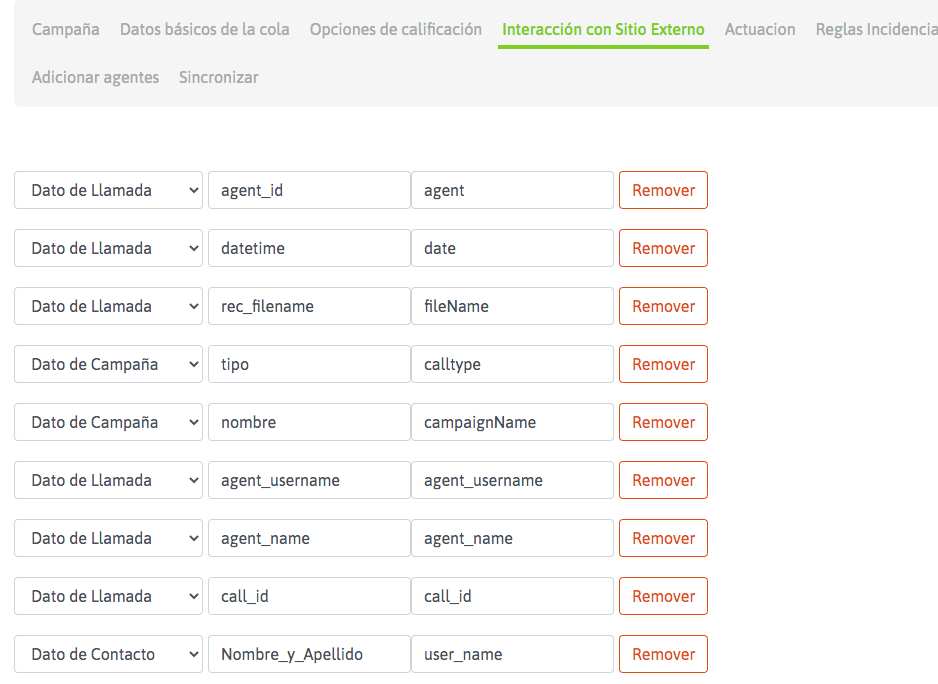
Figure 5: CRM campaign parameters
At this stage of the configuration of any campaign, we can indicate each of the parameters available in OMniLeads and which must be sent to the CRM every time a call is connected to an agent. These available parameters are grouped into five families:
Campaign data, consisting of the parameters;
id: is the campaign
id name: represents the name of the campaign
type: is the type of campaign
Call data, consisting of the parameters;
call_id: is the transaction identifier within OMniLeads.
agent_id: is the ID of the agent who is processing the call that triggered the request to the CRM.
agent_username: is the username of the agent.
agent_name: is the First and Last Name of the agent.
datetime: refers to the date/time of the call. phone: is the phone number of the contact with whom the call was connected to the agent.
contact_id: is the internal ID of the contact in the campaign.
rec_filename: the name of the file that contains the recording of the call connected to the agent.
Contact data would be parameters available from the columns of the current campaign contact database. This means that we can cite any column in the database as a parameter to send in a call to the CRM.
Fixed: You can set a parameter to be sent on each call.
Dialplan data, is a parameter that the Dialplan must send in a header in the originate
Qualification Data, made up of the parameters;
name: Name of the rating applied by the agent at closing.
form: management form with its saved data, encoded in base64.
Once each parameter of the system has been described, it can be seen in Figure 5 that three fields must be completed for each parameter to be sent:
1st Field: corresponds to the type of parameter (campaign data, call data, contact database data or fixed data).
2nd Field: corresponds to the specific name of the parameter to be sent (for example "name" if it is campaign data).
3rd Field: is the name of each parameter, expected from the CRM side.
Example 1: Invoking a CRM using GET
Let's assume you want to run the URL: https://mycrm.domain.com?idClient=321321321&idCamp=11&lang=en&recordingFile=prev-115-20190604-2-4149014-1559667982.424.wav
As you can read in our example URL, in each execution you must provide the following parameters:
Contact ID
ID of the campaign that invokes the CRM
A parameter "lang=es"
The recording of the current call
How would we then implement this requirement from what we have covered in this chapter?
Generate the new CRM
Figure 6 exemplifies the implementation of the proposed CRM as an example.
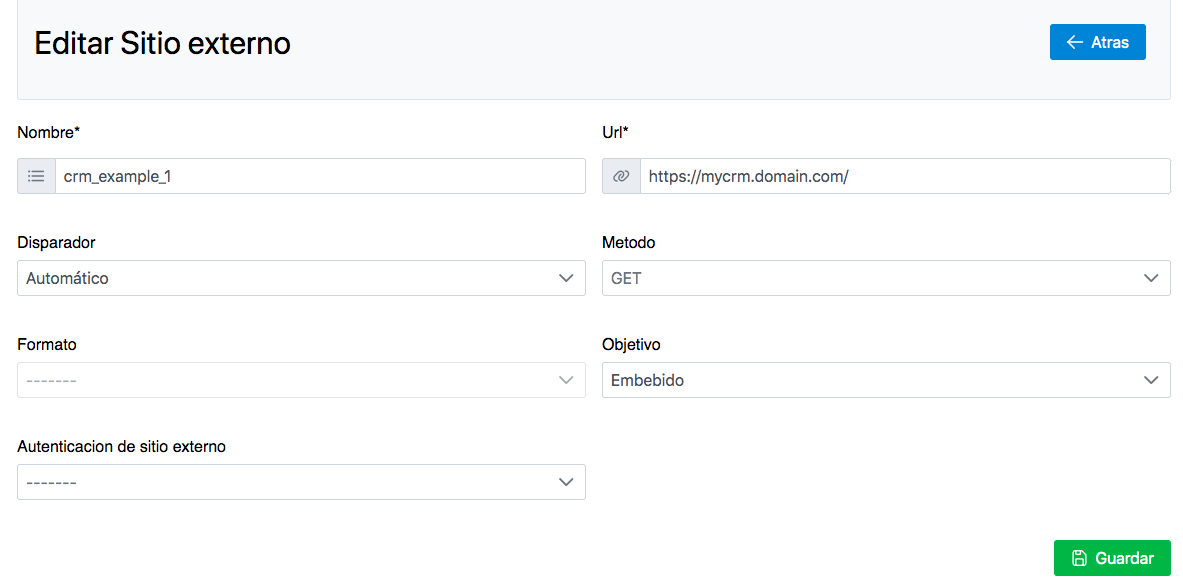
Figure 6: CRM definition
So now we move on to exemplify the configuration of the campaign to invoke the CRM with the parameters specified above. Figure 7 shows how to configure the campaign to work with the CRM in this example.
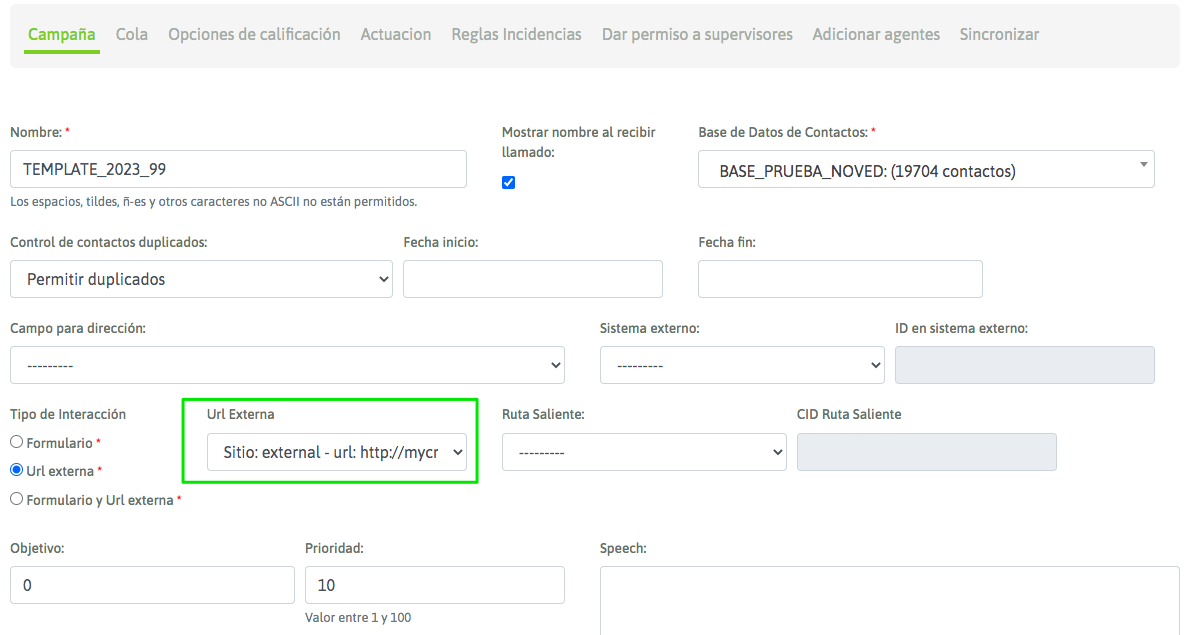
Figure 7: Campaign and CRM
The last step has to do with the assignment of the necessary parameters for each invocation to the CRM, in figure 8 we exemplify this step.
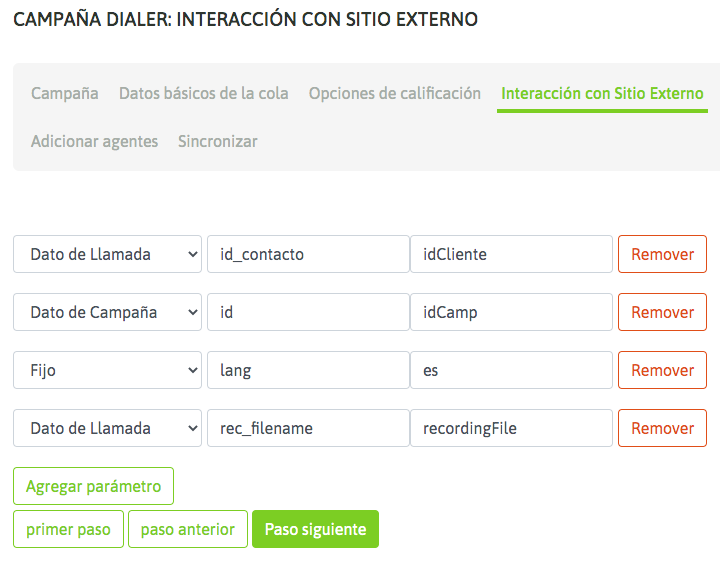
Figure 8: Campaign CRM parameters
Finally we highlight the relationship between columns 2 and 3 of each parameter, since they make up the assignment of the system parameters under the names of parameters expected on the CRM side.
Example 2: Calling a CRM using GET and Clean URLs
Let's assume you want to run a Clean URL: https://mycrm.domain.com/idClient/idCamp/lang/recordingFile
example: https://my_crm.domain.com/321321321/11/es/prev-115-20190604-2-4149014-1559667982.424.wav
As you can read in our example URL, in each execution you must provide the following parameters:
Contact ID
ID of the campaign that invokes the CRM
A parameter "lang=es"
The recording of the current call
How would we then implement this requirement from what we have covered in this chapter?
Generate the new CRM
Figure 9 exemplifies the implementation of the proposed CRM as an example.
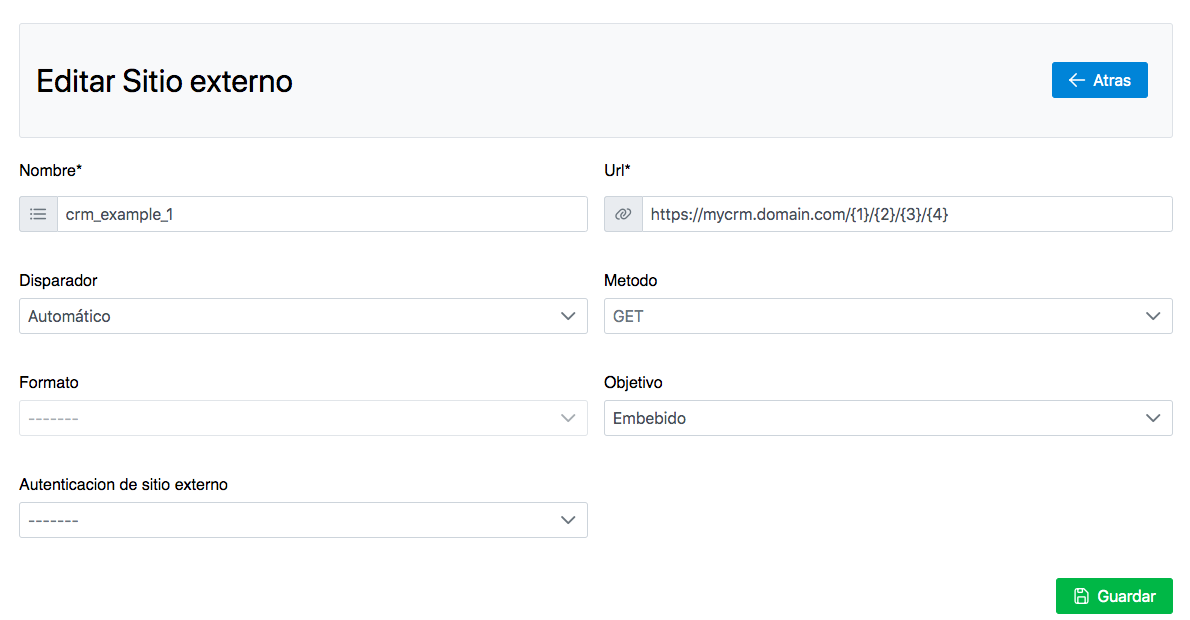
Figure 9: CRM definition with clean URL
The figure highlights the "holders" required to work with Clean URLs. When generating the URL to be executed, the parameters that will be generated in the request must be specified in curly brackets.
These parameters will then be assigned when generating the campaign that will invoke the external CRM.
Therefore, we now move on to exemplify the configuration of the campaign so that it invokes the CRM with the parameters specified above. The difference with respect to standard URLs (HTTP GET) that was explained in example 1, is that when assigning parameters in the campaign, "holders" must be used instead of "Parameter names", as exemplified in figure 10.
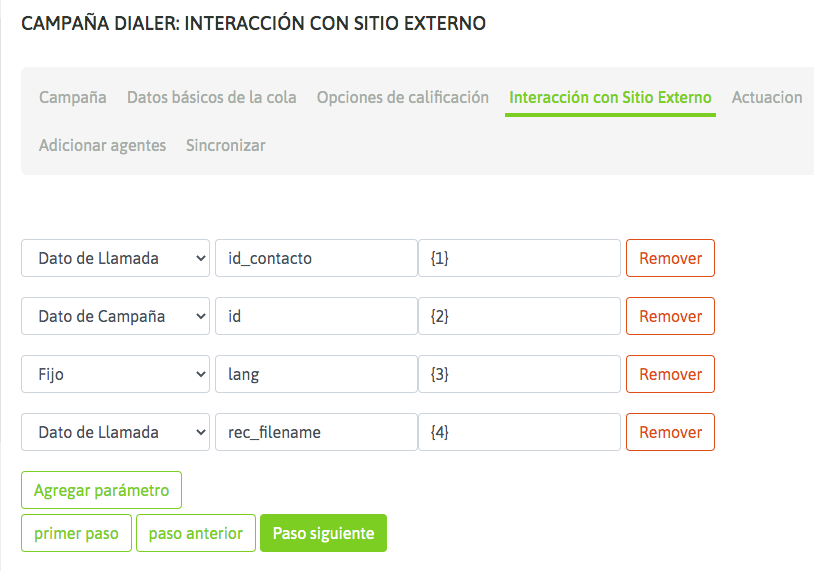
Figure 10: Campaign and CRM parameters
Finally, we highlight the relationship between columns 2 and 3 of each parameter, within the framework of the “clean URLs”.
Lifting custom channel variables from Asterisk and passing them to CRM
There are times when the business model requires the execution of a customized Asterisk dialing plan, in which case the entry of a DTMF value is requested or the possibility that Asterisk offers us to use voice recognition services to interact with the person who calls the contact center.
Let's try to illustrate a workflow with an example.

So let's say you want to ask a caller to enter their customer number. So you could take a DID from your SIP trunk and send it to a custom dialplan.
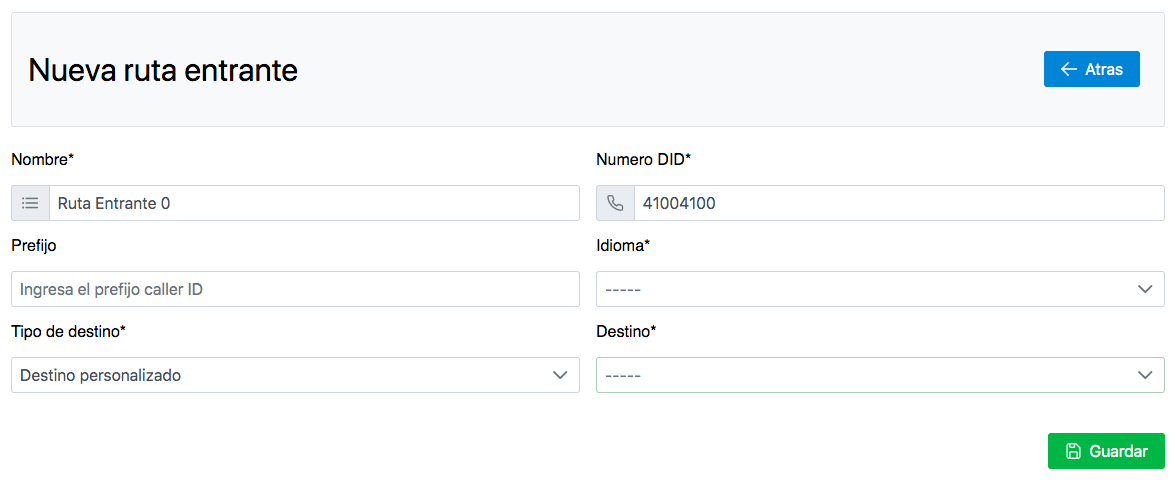
Then we will work on registering the custom destination and its code.

Regarding the dialplan itself, it is remembered that it must be generated in the file: oml_extensions_custom.conf.
Let's analyze the dialplan in question: First of all, and as expected, there will be a part where the developer captures the caller's interaction; in the case of the example, it is through the application of the READ dialplan.
Important!
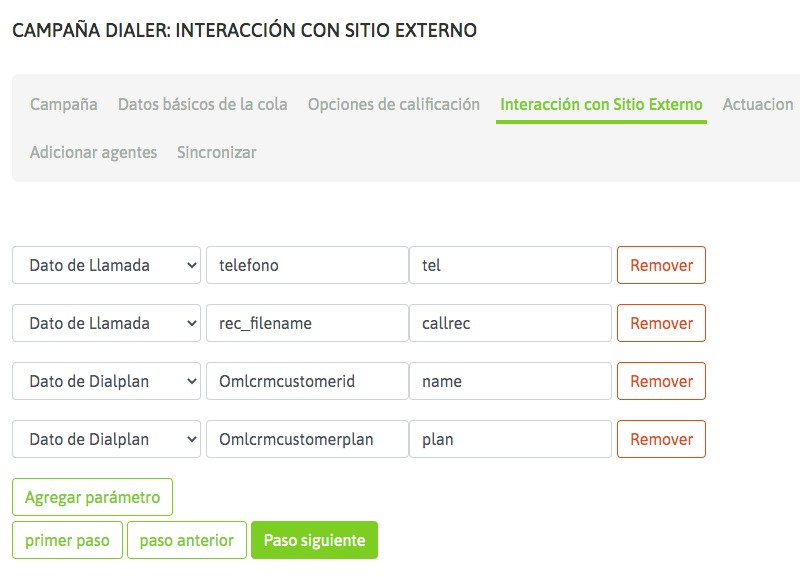
Variable names MUST contain the Omlcrm prefix
You MUST create the variable OMLCUSTOMDIALPLANVARS that contains ALL the variables you want to pass to the CRM concatenated with the & character.
To send the call to an OMniLeads node, the following must be invoked in the dialplan: Gosub(sub-oml-dst-switch,s,1(X,Y)) where X is the destination type:
1 inbound campaing
2 time conditional
3 IVR
6 Survey
while the Y value refers to the ID of the object in question. In our example (1,5) the 1 refers to an incoming campaign whose ID is 5.
Finally, in the campaign in question, the integration with CRM is configured as follows:
Last updated