🇬🇧
Omnileads Docs
ComunidadForo
English
English
  • 👶Introduction to OMniLeads
    • OMniLeads General Specs
    • Architecture and components
  • 🚀OMniLeads installation methods
    • Deploy using Docker
      • Deploy with Docker-Destkop
      • Deploy with Docker for VPS Cloud or VM
      • Deploy with Docker for VPS Cloud or VM with External Bucket
    • Deploy with Ansible
      • AIO (All-In-One) Deploy
      • AIT (All-In-Three) Deploy
      • HA (High Availability) Deploy
      • Backups, Restores, Upgrades and Rollbacks
      • Migration from CentOS7
    • OMniLeads Enterprise
    • Development Enviroment Deploy
    • First Login
    • TLS/SSL Certificates
    • Monitoring and observability
    • Security considerations
  • ⚙️Initial Configuration
    • External Authentication
    • Text To Speech (TTS)
  • 🎯CX Survey (Pro)
    • Reports
  • 📈Premium Reports (Pro)
    • Activity Reports
    • Analyzing Results
  • 🎞️Video Calls (Pro)
    • Wordpress Plugin
    • Initial Configuration
    • Webphone Demo
    • Embedding the Webphone
  • ☎️Voice Channel Configuration
    • General SIP trunk parameters
  • 🆗Whatsapp Channel Settings (Pro)
    • OMniLeads & GupShup
    • Register WhatsApp Business in GupShup
    • Message Templates and Time Groups
    • Providers
    • Lines
  • 🚧Wallboard for Business (Pro)
    • Creating a Wallboard
    • Adding Widgets and Realtime Pages
    • Exploring Widgets and Metrics
  • 📤Whatsapp Bulk Messaging (Pro)
  • 💬Contact Campaigns
    • Inbound Campaign
      • Incoming Call Routing
      • Forwarding incoming calls from the PBX
      • Time range conditioned routing
      • IVR - Interactive Voice Response
      • Incoming Caller ID
      • Ejecución de dialplan personalizado
    • Manual Campaign
    • Preview Campaign
    • Dialer Campaing
    • Whatsapp Campaign (Beta)
  • 🎧Agent handbook
    • Login Logout
    • Manual calls from contact list
    • Preview Calls
    • Dialer inbound calls
    • Inbound calls
    • Calls between agents
    • Contact List
    • Whatsapp Messages
  • 🛑Reports, recordings and monitoring
    • Recordings
    • Incoming Campaign Reports
    • Outbound Campaign Reports
    • General call report
    • Agent reports
    • Whatsapp reports (Beta)
    • Conversation Reports
    • Supervision
  • 📊Backoffice - Management audit
  • ☎️Integration between OMniLeads and PBXs
  • 🛠️IT administrator's tasks
  • 🧩CRM Integration
    • Interaction from OMniLeads to CRM
    • Interaction from CRM to OMniLeads
  • 🔐Security considerations
  • 📌OMniLeads RESTful API
    • Agent Session API in Asterisk
  • 🗒️Release Notes
  • ❤️Community
  • 🎇About us
Con tecnología de GitBook
En esta página
  • Bash Script y Ansible as key components 📋
  • Systemd & Podman for component's management 🔧
  • Next steps:
  1. OMniLeads installation methods

Deploy with Ansible

AnteriorDeploy with Docker for VPS Cloud or VM with External BucketSiguienteAIO (All-In-One) Deploy

Última actualización hace 12 meses

It is essential to have a Linux distribution with Podman installed (3.0.0 or higher). Currently, modern operating systems like Debian, Ubuntu, Rocky, or Alma Linux, have repositories enabled that allow downloading it.

In the following section, we will cover the steps necessary to have OMniLeads running in containerized environments.

Note: If you are working on a VPS with a Public IP, it is mandatory to have a network interface dedicated to a Private IP.

To do this, we proceed to clone the project's Deploy Manager repository and position ourselves in the Ansible folder:

git clone https://gitlab.com/omnileads/omldeploytool.git
cd omldeploytool/ansible

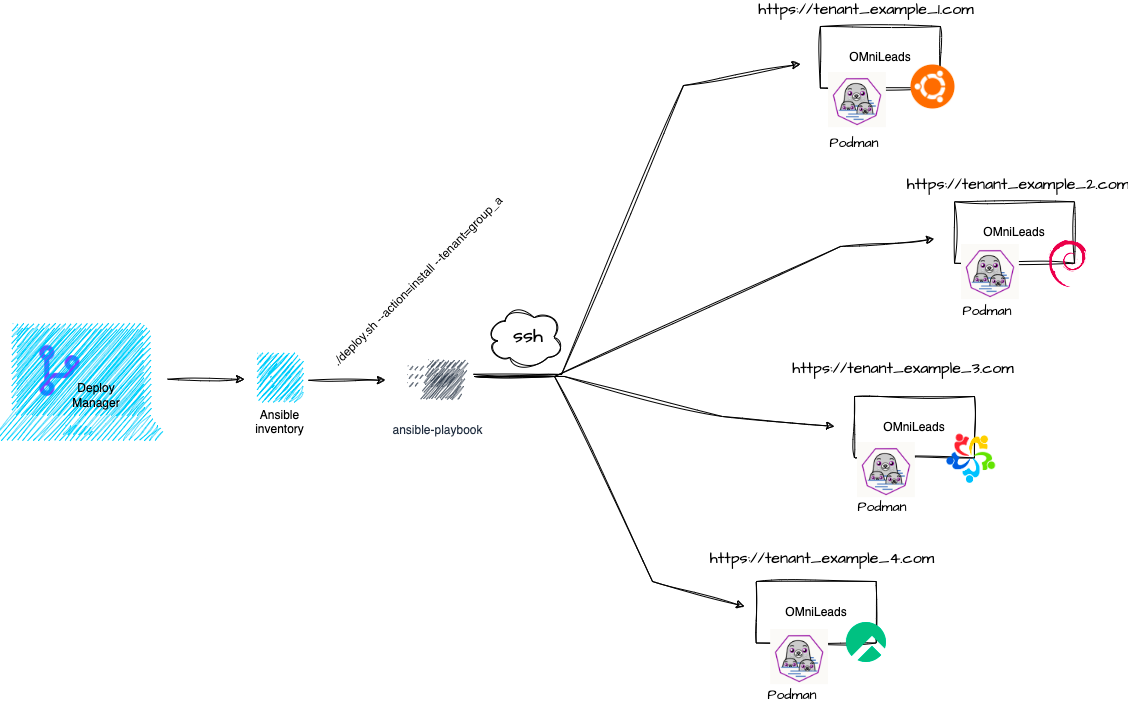
It is important to highlight that using the Deploy Manager with Ansible will allow us multiple administrative actions:

Managing OMniLeads Instances

  • Manage hundreds of OMniLeads instances in parallel using inventory files.

  • Conduct Disaster Recovery processes: backups & restores.

  • Perform upgrades & rollbacks.

  • Create new instances.

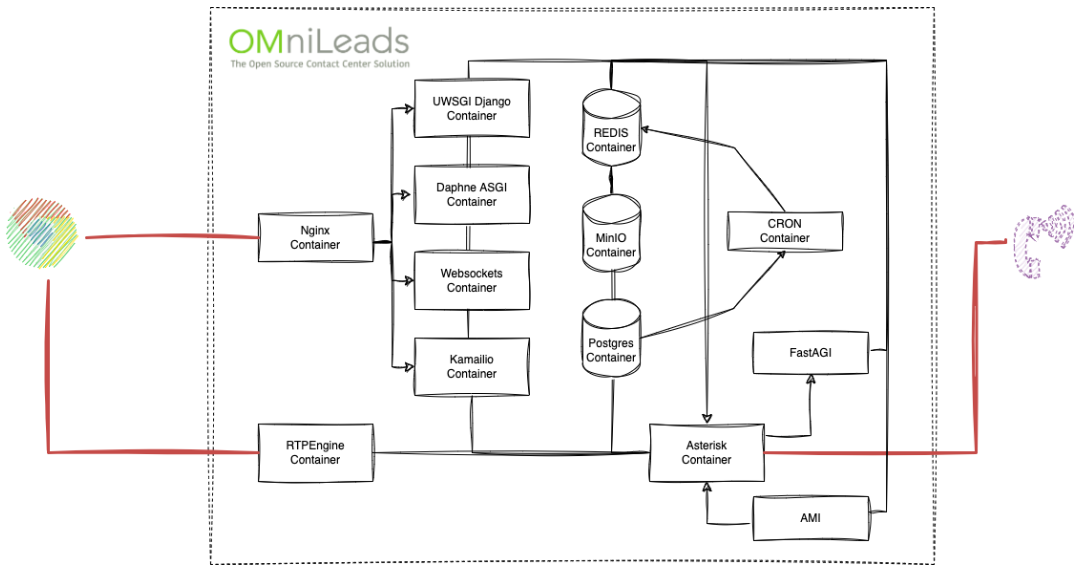
Below is a sketch of the container-based architecture and its involved components: For each operational instance, a collection of components is invoked using SystemD services, each running in a container. It is also possible to group these containers into separate physical instances (horizontal cluster) and give them redundancy and availability features (HA cluster).
Bash Script y Ansible as key components 📋

Running the following command, we can interpret its possible uses: This bash script will be responsible for executing multiple actions on one or more tenants simultaneously. Basically, it searches for the inventory file according to the location specified on the command line and from there launches the Ansible "root" Playbook (matrix.yml). An instance of OMniLeads is deployed on a Linux server using SystemD and Podman, from a Bash Script that is fed with environment variables and uses a set of Ansible files for automation (Playbooks + Templates).

./deploy.sh --help

If the goal is to run installations, upgrades, backups, or restores, two fundamental parameters must be specified:

  • --action=

  • --tenant=

In the following example, the script will perform an installation action on the "tenant-folder," which contains the inventory file with the description and parameterization of its tenant(s).

./deploy.sh --action=install --tenant=<tenant-folder>

Systemd & Podman for component's management 🔧

Under this installation method, we will have the ability to manage containers (components) as traditional SystemD services.

systemctl start component
systemctl restart component
systemctl stop component

Below is an example showcasing the SystemD file for the Nginx component: /etc/systemd/system/nginx.service:

Every action triggered by the systemctl command results in a Podman container being started, stopped, or restarted. This container arises from an image invoked based on the environment variables configured in the deployment.

[Unit]
Description=Podman container-oml-nginx-server.service
Documentation=man:podman-generate-systemd(1)
Wants=network-online.target
After=network-online.target
RequiresMountsFor=%t/containers

[Service]
Environment=PODMAN_SYSTEMD_UNIT=%n
Restart=on-failure
TimeoutStopSec=70
ExecStartPre=/bin/rm -f %t/%n.ctr-id
ExecStart=/usr/bin/podman run \
  --cidfile=%t/%n.ctr-id \
  --cgroups=no-conmon \
  --sdnotify=conmon \
  --replace \
  --detach \
  --network=host \
  --env-file=/etc/default/nginx.env \
  --name=oml-nginx-server \
  --volume=/etc/omnileads/certs:/etc/omnileads/certs \
  --volume=django_static:/opt/omnileads/static \
  --volume=django_callrec_zip:/opt/omnileads/asterisk/var/spool/asterisk/monitor \
  --volume=nginx_logs:/var/log/nginx/ \
  --rm  \
  docker.io/omnileads/nginx:230215.01
ExecStop=/usr/bin/podman stop --ignore --cidfile=%t/%n.ctr-id
ExecStopPost=/usr/bin/podman rm -f --ignore --cidfile=%t/%n.ctr-id
Type=notify
NotifyAccess=all

[Install]
WantedBy=default.target

Nginx will have its environment variables file defined as follows:

DJANGO_HOSTNAME=172.16.101.221
DAPHNE_HOSTNAME=172.16.101.221

KAMAILIO_HOSTNAME=localhost
WEBSOCKETS_HOSTNAME=172.16.101.221
ENV=prodenv

S3_ENDPOINT=http://172.16.101.221:9000

Next steps:

Depending on the structure of the inventory file and its defined variables, OMniLeads can be remotely deployed in 3 possible schemes:

: All components represented in containers are deployed on the same Linux Host.

: Components are grouped in a Horizontal Cluster structure (useful for high traffic or high load scenarios).

: The components are grouped into two Active-Passive nodes for High Availability support.

🚀
Correr OMniLeads All in One con Podman & Systemd
Correr OMniLeads Cluster con Podman & Systemd
Correr OMniLeads Cluster HA con Podman & Systemd