Dialer Campaing
Presentation
OMniLeads offers the concept of campaigns with automatic call dialing, through a predictive dialer.
IMPORTANT!
The automatic dialer functionality is not provided within the software's features. For this type of campaign, integration with WombatDialer is contemplated. The use of this software is subject to the acquisition of the corresponding license from the manufacturer of said software. Once the issue of the engine dialer component has been clarified, we proceed to explain the steps required when generating a campaign with predictive dialing.
Dialer campaign creation
Go to the Campaigns -> Dialer Campaigns -> New Campaign menu, where a sequence of configuration steps is displayed. The first screen looks like the following figure:
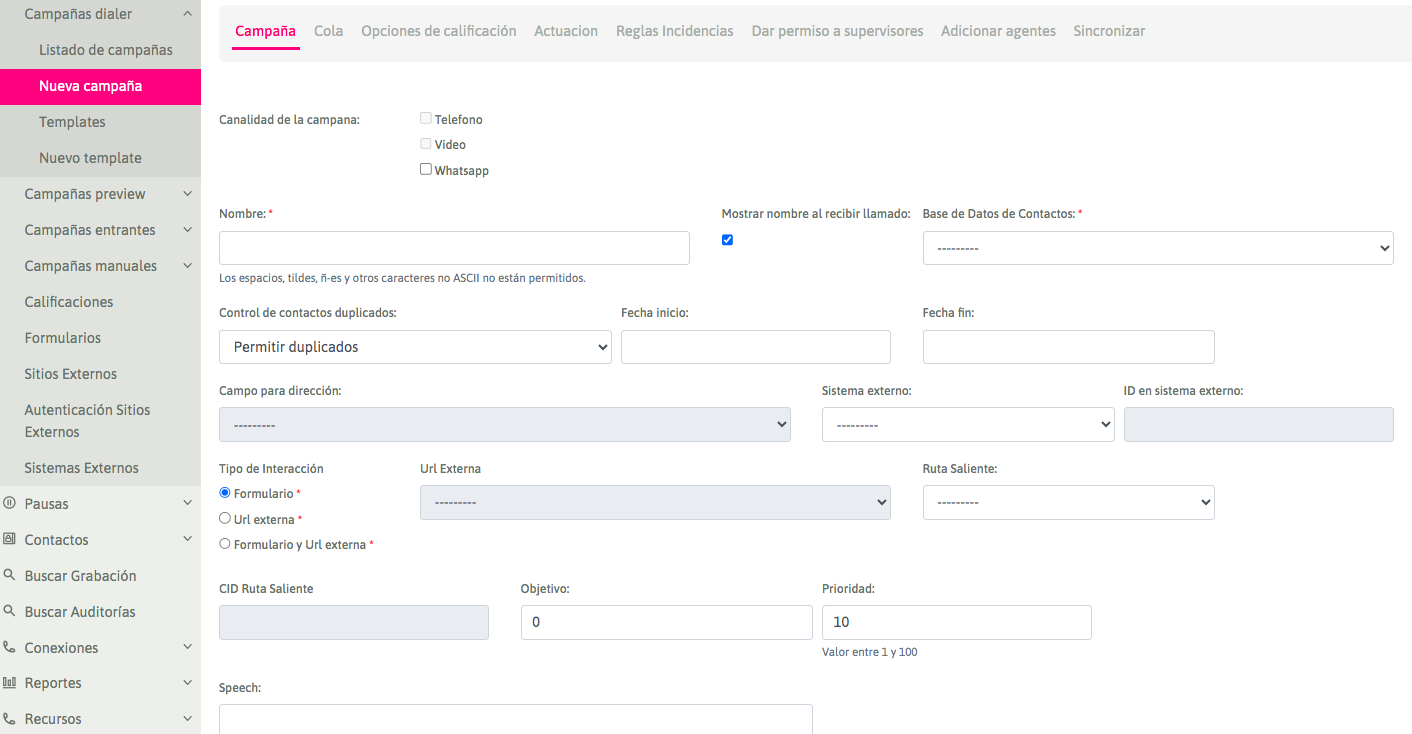
Figure 1: Campaign parameters
Campaign Channel: These are the channels that will be accepted in the campaign. Visit the Whatsapp Business section to properly configure the Whatsapp channel.
Name: Name of the campaign.
Show name when receiving call: This can be enabled so that each call connected by the dialer to the agent involves the notification of the name of the campaign associated with said call.
Contact Database: The contact database that the dialer will use to take contacts and generate calls.
Duplicate Control: Used to control duplicate records in databases. Options are: Allow Duplicates / Avoid Duplicates.
Start date: This is the date on which, once the campaign is active and with agents connected, dialing will begin.
End date: This is the date on which, while the campaign is active and with agents connected, the call will stop even if there are still numbers pending to be dialed.
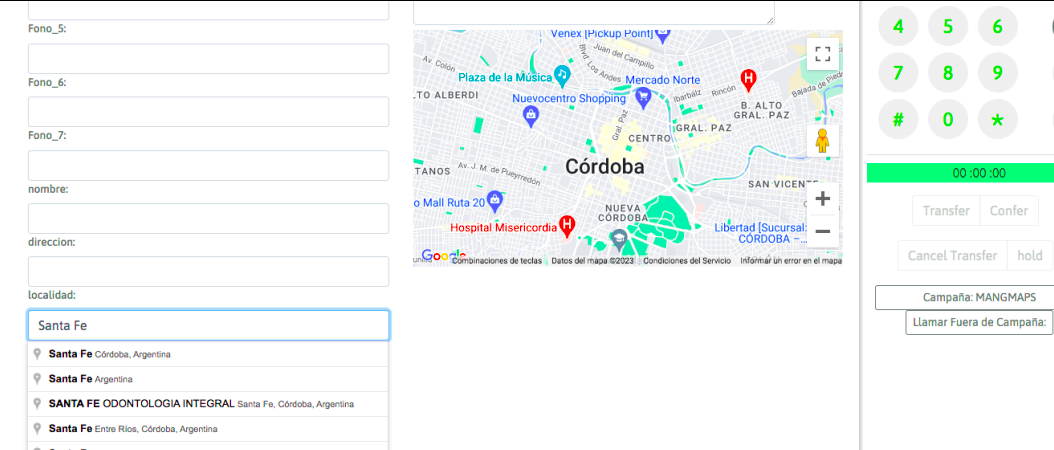
Address Field: If you have activated the integration with Google API, this option allows you to select the database field that will serve as the Contact's Geolocation. The associated map will be included within the record in the Agent Console.
External URL: The URL (http-request) triggered each time the dialer connects a call to an agent.
Interaction Type: Indicates whether the campaign will operate with OMniLeads forms, invocation to a CRM (External URL) for each connected call, or both methods simultaneously.
External System ID: This field must contain the ID of the campaign within the external management system, from which "click to call" or "qualification requests" will be received.
External System: External management system that is supported for launching "click to call" or "qualification" actions on the campaign's contacts.
Speech: Campaign speech to be displayed on the agent console during campaign calls.
Priority: This field allows assigning a campaign priority, in case several campaigns need to run simultaneously, but one needs to be given dialing priority. The default value is 10, and the possible value range is 1 to 100 (a lower value implies lower priority).
Objective: Defined as the number of positive outcomes expected for the campaign. The campaign supervision shows in real-time the campaign's progress percentage relative to the set objective.
Outgoing CID Route: This field must contain the CID assigned to an existing outgoing route for a campaign.
Outgoing Route: An existing outgoing route is assigned to a campaign.
Once these fields are completed, you must click the "Next Step" button to continue with the configuration of your campaign. On the next screen, you establish more parameters that model the behavior of the campaign, as shown in the following figure:
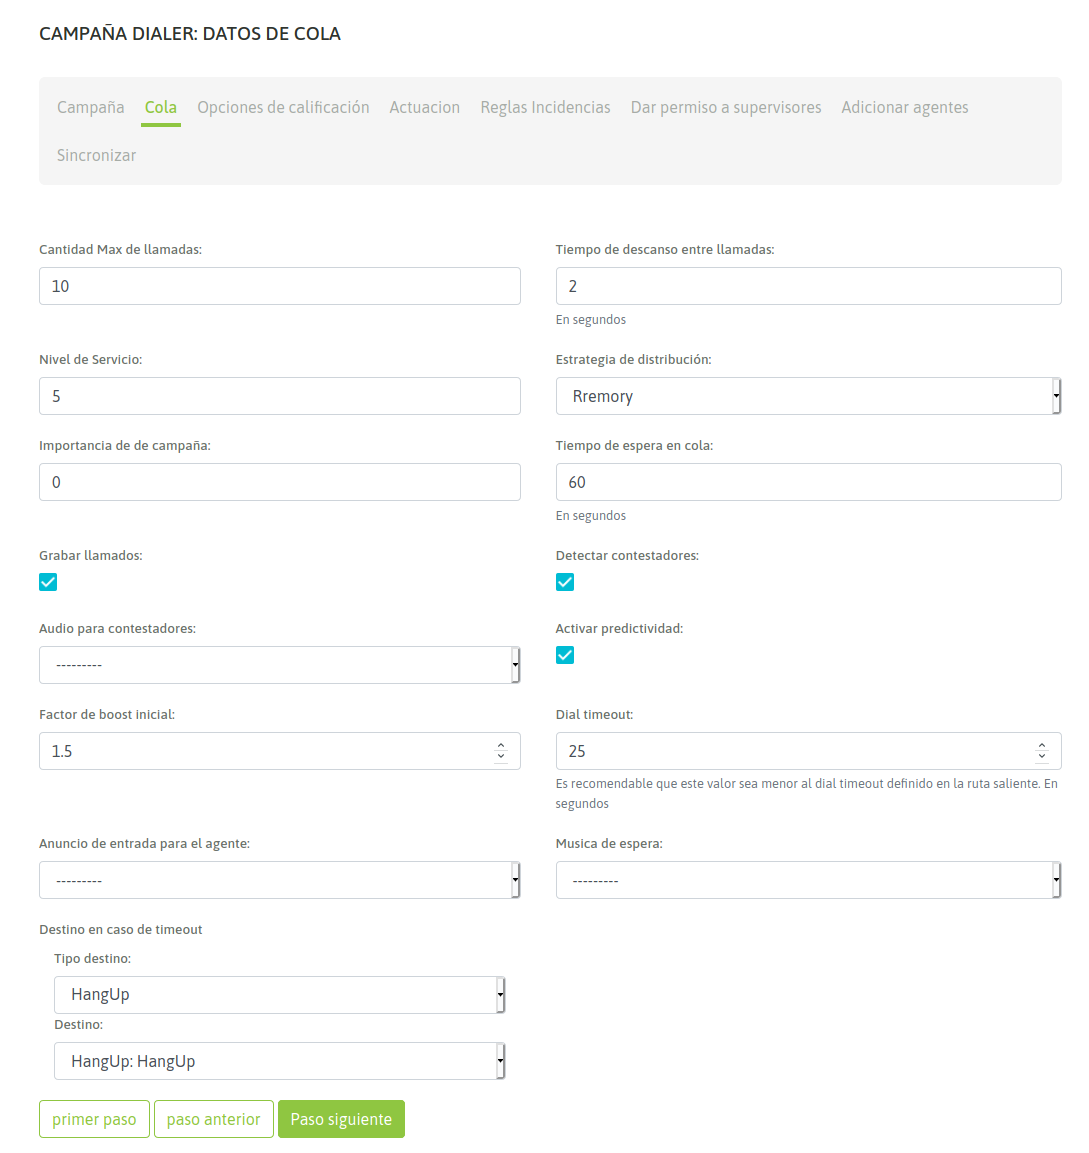
Figure 2: Campaign parameters
Maximum number of calls: Number of calls that are allowed to be queued while waiting for an agent to become available. Above this number, the call will be sent to the “failover” action.
Time off between calls: This is the time off (in seconds) that each agent has between each call connected by the dialer.
Service level: This is a parameter to measure how many calls were connected to an agent within that time frame (in seconds).
Distribution strategy: Call distribution method that the campaign will use on the agents. For outbound campaigns, RRMemory is recommended.
Campaign importance: This is a linear parameter on a scale of 1 to 10, which implies how important the calls from this campaign are compared to others. It establishes priorities for agents working on several campaigns simultaneously. If the value is left at “0” (default) equity is maintained with the rest of the campaigns.
Queue waiting time: This is the time (in seconds) that the contacted call will remain in the waiting queue, waiting for an agent to be freed up to connect it to the call.
Record calls: Enables all calls in the campaign to be recorded. Detect answering machines: Enables the detection of answering machines.
Audio for answering machines: You can indicate the playback of an audio in case an answering machine is detected. For the audio to be available, it must be previously uploaded from the Telephony -> Audios -> Custom audios menu, "Add" button.
Activate predictiveness: The dialer offers a configuration that makes it possible to review statistics on the effectiveness of the campaign during its performance. Based on these results, vary the number of calls generated per available agent in such a way that dead times between each call assigned by the dialer to each agent are avoided.
Initial boost factor: Indicates the value by which you want to multiply the predictive behavior. For example, if the dialer detected that it can make 3 calls simultaneously because that is the result of the successful communications statistics, by placing “2” in the initial boost factor, the dialer is asked to double that value and will then make 6 calls at once.
Dial timeout: This is the time (in seconds) of ringing before sending a CANCEL. Agent entry announcement: An audio can be selected to play when a call from the campaign enters an agent. For the audio to be available, it must be previously uploaded from the Telephony -> Audios -> Custom audios menu, “Add” button.
Hold music: A hold music can be selected especially for the campaign, which will be played until there is an agent available to answer the call, or until the queue wait time is reached and the call is directed to the destination in case of timeout. For the hold music to be available, it must be previously added in the Telephony -> Audios -> Hold music lists menu, “Add” button.
Destination on timeout: Destination to which calls that have expired without connecting to an agent (timed out) will be sent.
After completing all the fields, you must press the "Next Step" button. On the next screen, you configure the rating options, selecting one by one from the drop-down menu the ratings that will be used for the calls within the campaign. In addition, you must indicate whether it is a "Management" rating (the one that triggers the campaign form) or a "No Action" rating that simply classifies the contact. IMPORTANT: You cannot change the Management Form previously selected in the Rating Options Wizard if the Management Rating has already been used in the campaign.
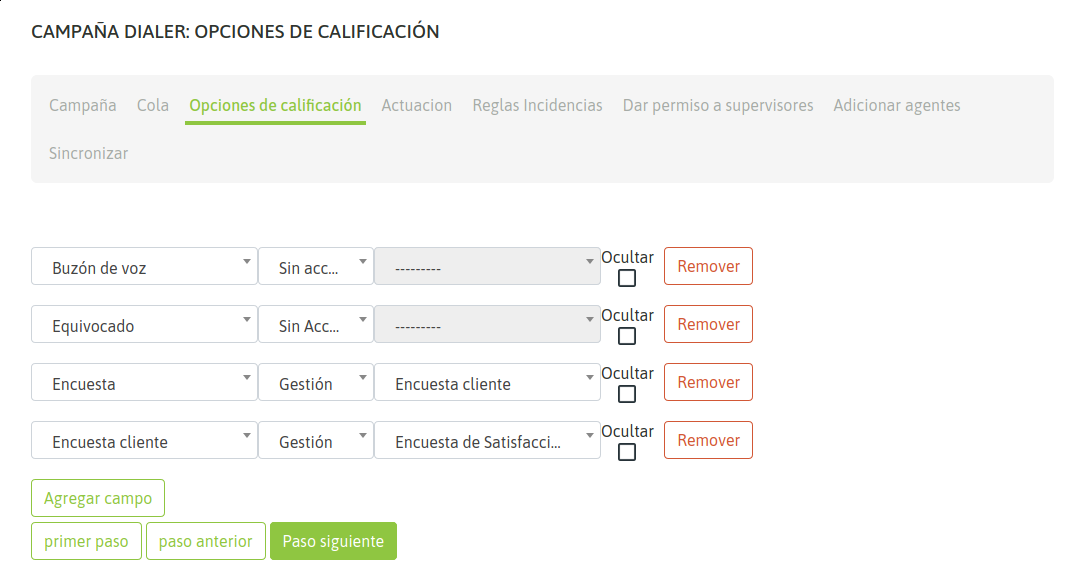
Figure 3: Campaign Parameters - Ratings Save your changes by clicking on "Next Step" and you will be taken to the settings that determine which days of the week and within which times the campaign will make calls (always within the date range established in the first step of creating the campaign):
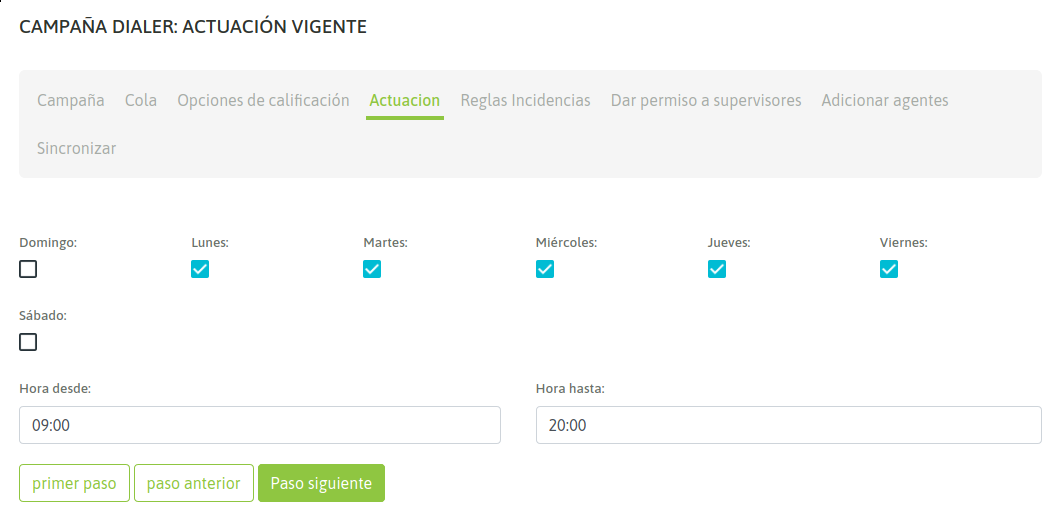
Figure 4: Campaign parameters - Days and hours Click on "Next step", and in this case you work with the "incidence rules", that is, under which conditions you will try to contact numbers that were Busy, Answering, No Answer, Temporarily out of coverage, etc.:
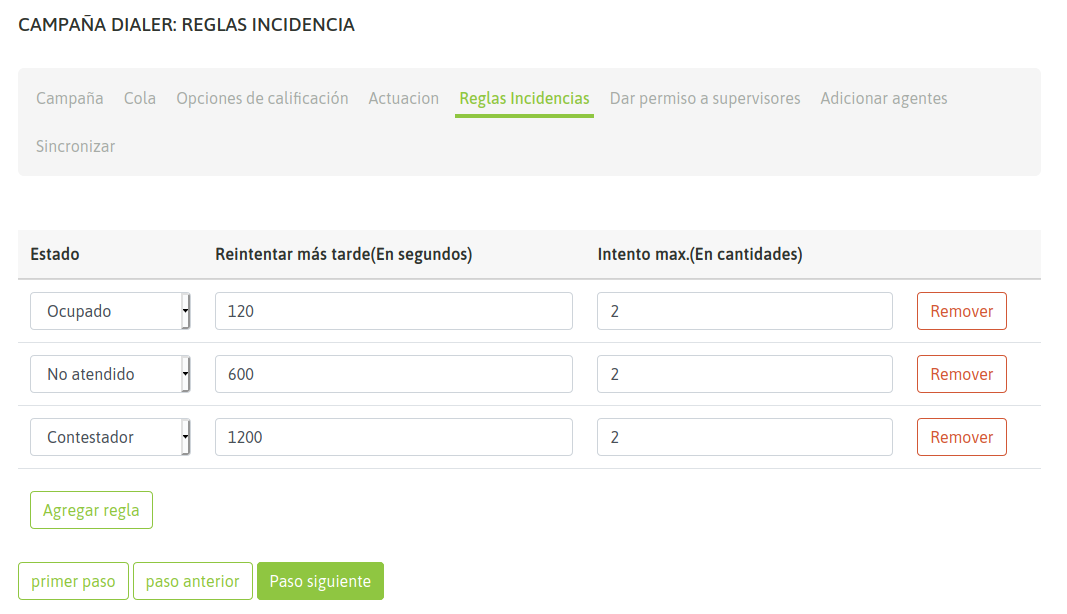
Figure 5: Campaign parameters - Incident rules As can be seen in the figure above, the fields to be completed allow you to determine how many seconds the communication should be retried and how many times at most it should be attempted according to each status. The telephone statuses that can be automatically retried are: Busy. Answering machine detected. Destination does not answer. Call rejected (Rejected): When the call could not be placed due to problems inherent to the external telephone network. Timeout: When the call was contacted, connected, but no agent was free to handle it. Click on «Next step» to assign the campaign supervisors:
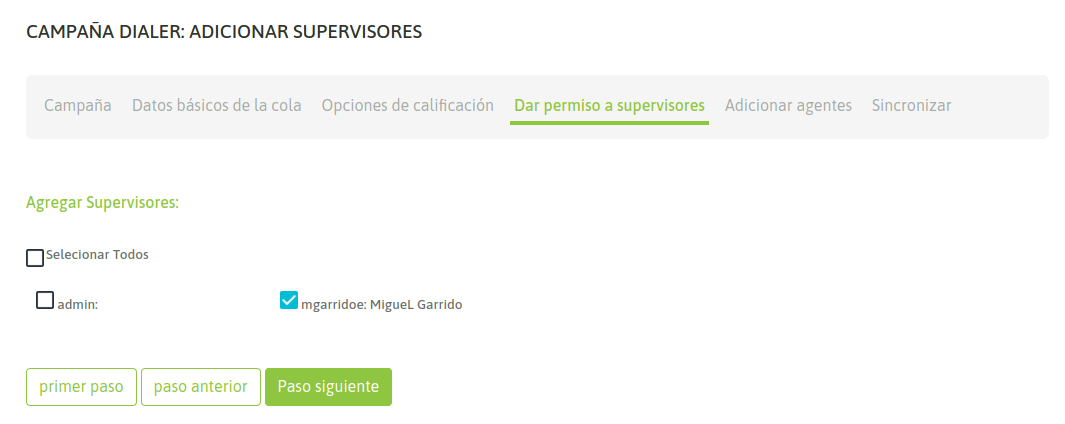
Figure 6: Campaign Parameters - Supervisors Click on «Next Step» to assign the campaign agents:
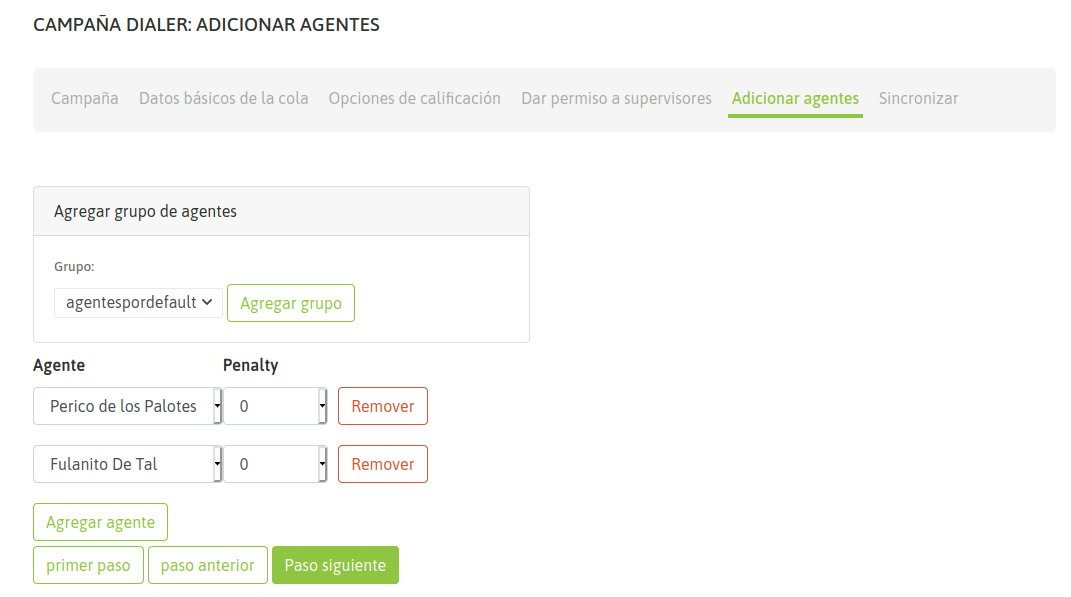
Figure 7: Campaign Parameters - Agents Click on "Next Step" to get to the last step of creating the campaign:
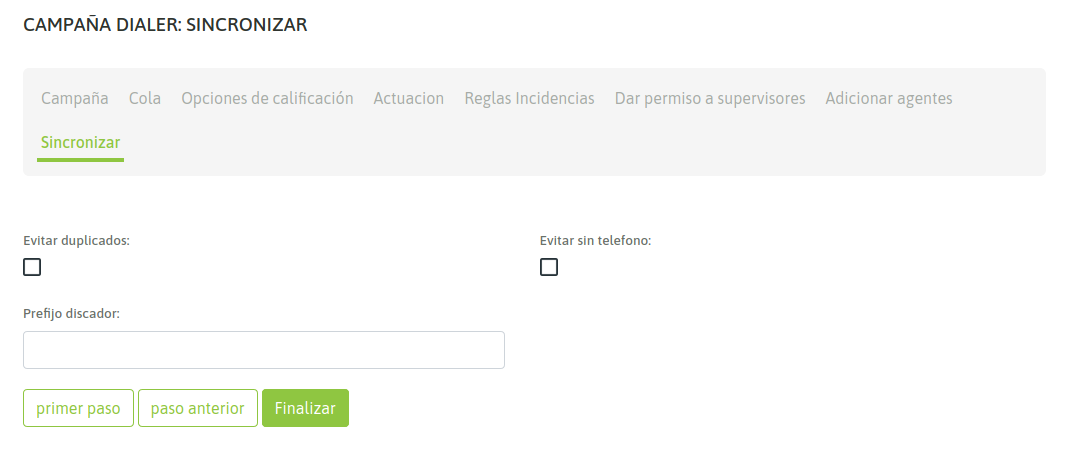
Figure 8: Campaign Parameters - Synchronize In this step, you simply indicate 3 options: Avoid duplicates: Select this option to avoid uploading to the dialer records with a duplicate primary phone number. Avoid without phone: Select this option to avoid uploading to the dialer records from the contact database that do not have a primary phone number. Dialer prefix: This field is used to indicate to the dialer whether it should add a prefix before each number in the contact database when dialing each call in the campaign. Finally, we click on the "Finish" button to finalize the creation of our campaign.
Campaign activation
The newly created campaign appears in the Inactive status, within the list of predictive campaigns, as shown in the following figure:

Figure 9: Inactive campaign The administrator must activate the campaign manually:
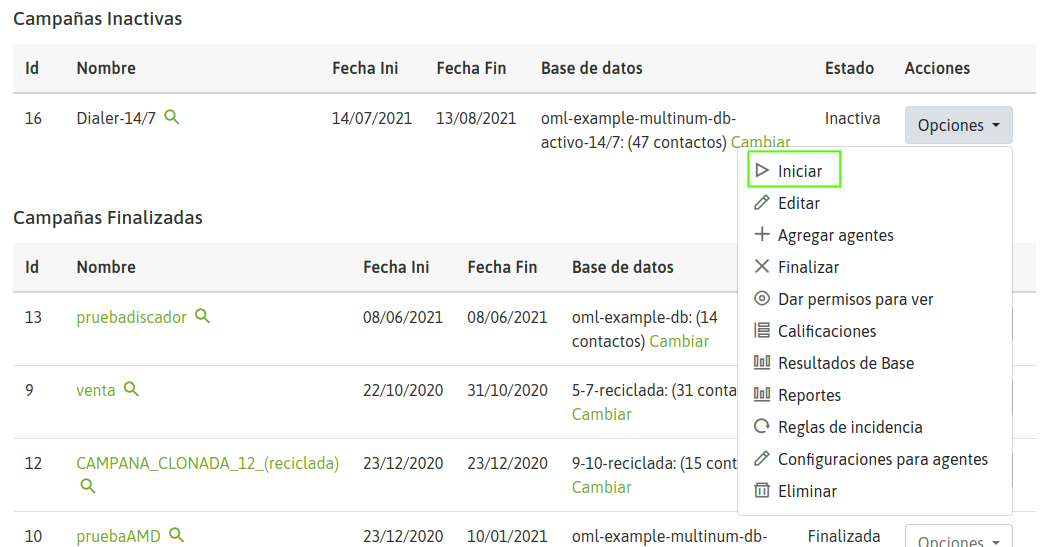
Figure 10: Activate campaign After activating our campaign, we automatically move on to viewing it in the active campaigns section, as shown in the following figure:
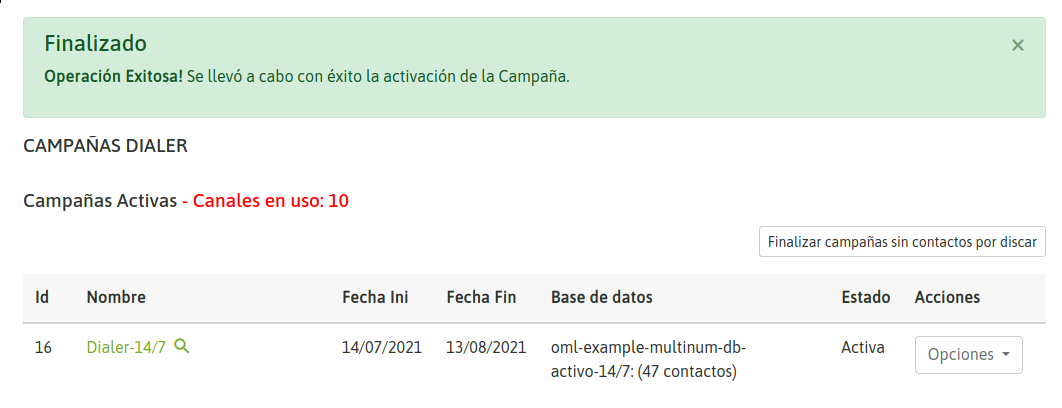
Figure 11: Active campaigns As soon as an agent assigned to our predictive campaign enters the platform, as long as it is within the active date and time range of the campaign, then the dialer can begin generating calls and deliver them to the active agents in the campaign.
Completion of dialer campaigns
To determine when a predictive campaign has no records to mark, you must check the status of the campaign by clicking on the name of the campaign, as shown in the following figure:
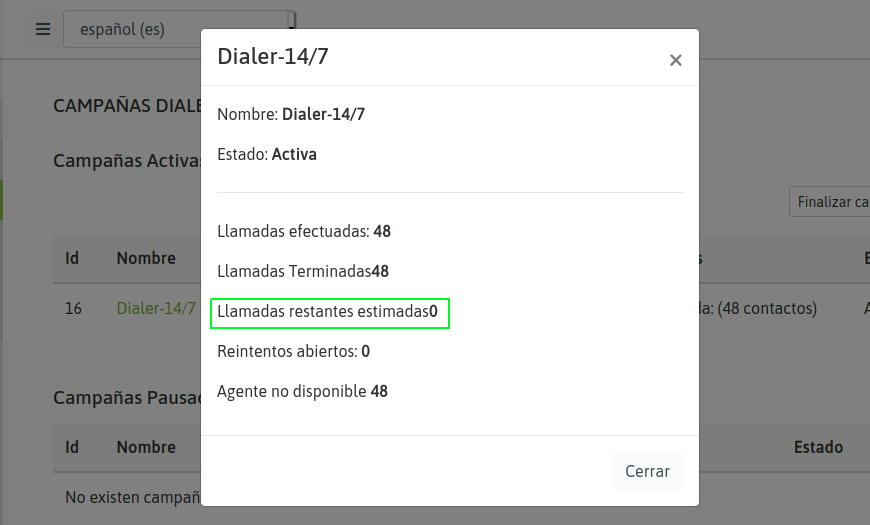
Figure 12: Campaign Pending Calls When the “Pending Calls” value is set to 0, the “End Campaigns without Contacts to Dial” button must be pressed to end all campaigns without contacts to dial, as shown in the following figure:
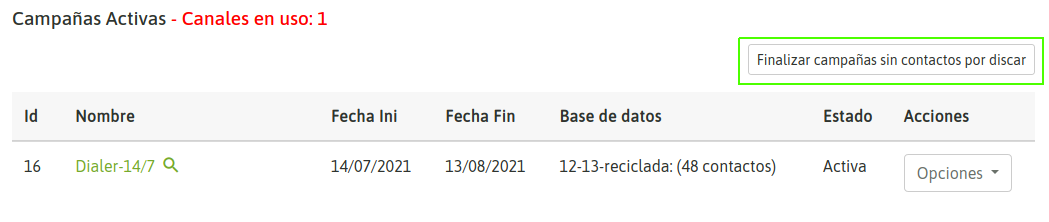
Figure 13: End campaigns without dialing contacts
Or they can be ended individually:
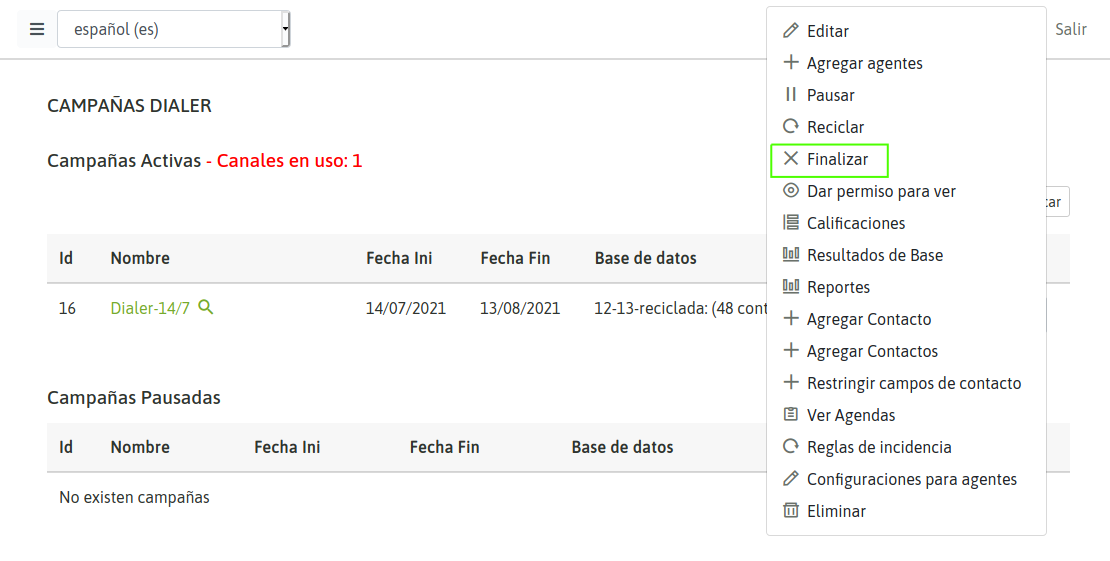
Figure 14: End the campaign individually The campaign then moves to the list of Ended Campaigns.
Recycling and rotation of contact bases
Whenever a predictive campaign runs out of records to mark in its contact base, then our campaign can be reused through 2 possibilities:
1) Recycle the contact database
This option allows the administrator to select contacts from the database with certain ratings made by agents (on connected calls) as well as ratings made by the dialer (on uncontacted calls -busy, no answer, voicemail, etc.-), when forming a criterion to recycle the contact database of the current campaign, so that the dialer calls back the contacts that fall within the ratings indicated in the recycling. To recycle a finished campaign, we must display the «Options» menu of the campaign, and select «Recycle», as shown in the following figure:
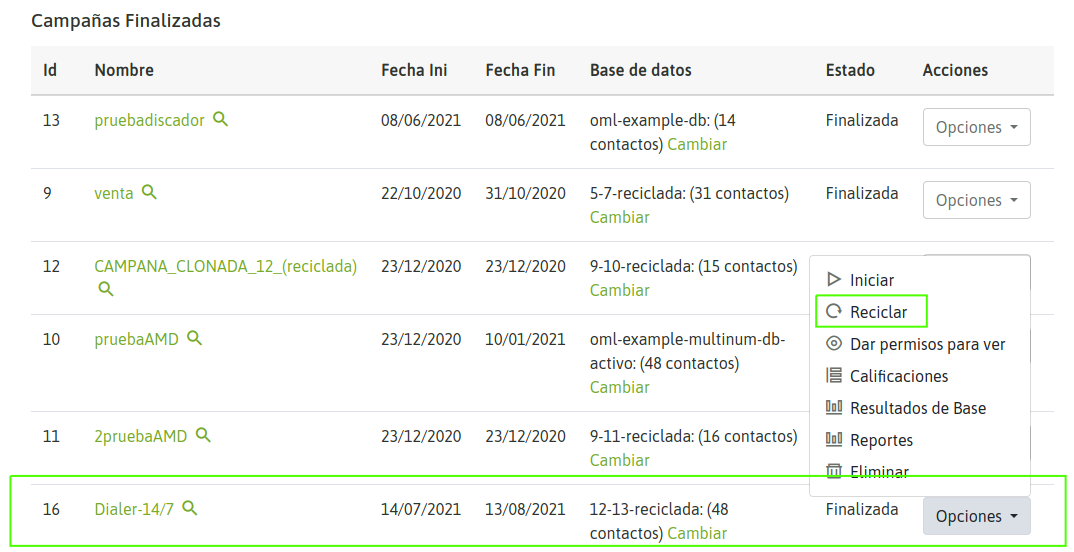
Figure 15: Campaign recycling
The different ratings will be displayed there and we can choose between 2 recycling modes:
Recycle on Same Campaign: Retarget selected contacts from the same campaign.
Recycle on a new clone campaign: Re-mark the selected contacts, but on a new campaign similar to the original, and whose contact base will be the result of the recycling.
To complete the procedure, you must select the ratings you wish to recall, and then go through the predictive campaign setup steps in case you need to adjust any configuration parameters of the recycled campaign:
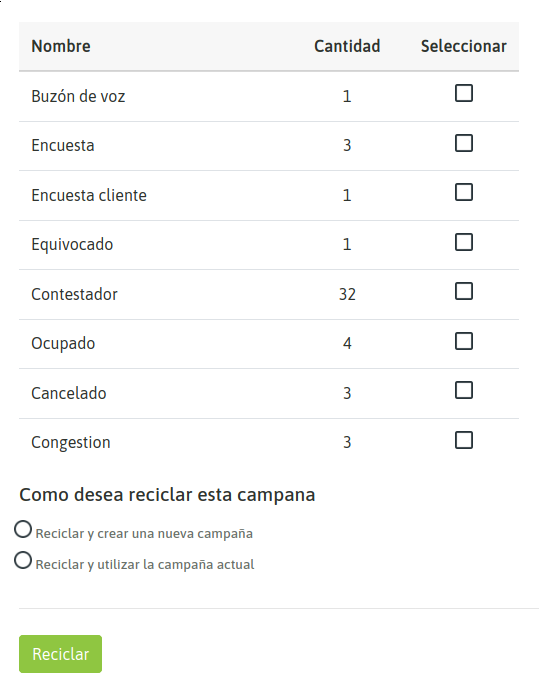
Figure 16: Recycling, call ratings

Figure 17: Parameterization of recycled campaign
When executing the recycling, the campaign is in the "Inactive" state, therefore it remains to activate it so that the recycled contacts begin to be marked by the dialer:
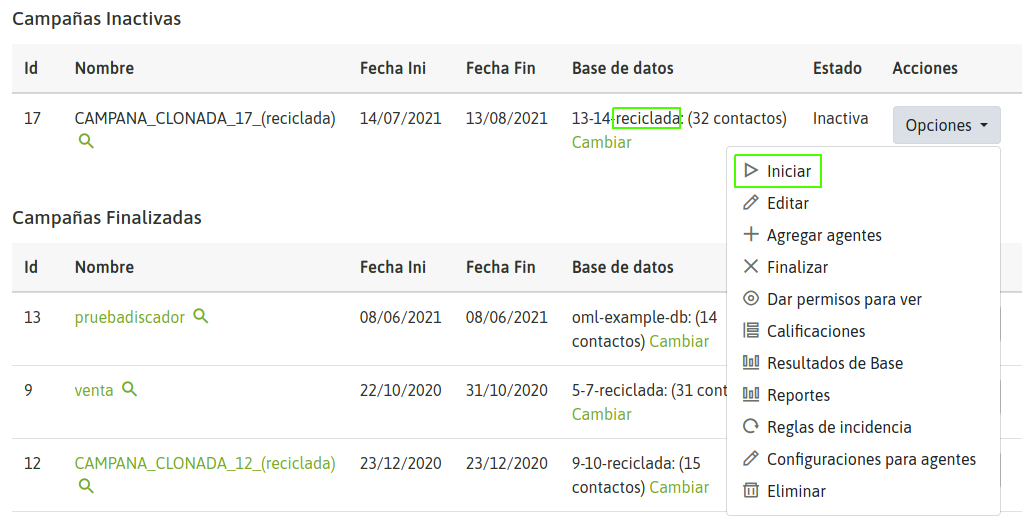
Figure 18: Activating a recycled campaign 2) Replacing the contact database A campaign can replace its database with a new one.
This allows you to continue operating with the same campaign but renew the source of contacts to be called. In this way, the history of reports, recordings and other statistics in the same campaign is followed. To carry out a database change, the campaign must be paused or in the “finished” status.
From there, the “base change” action is indicated on the campaign in question:
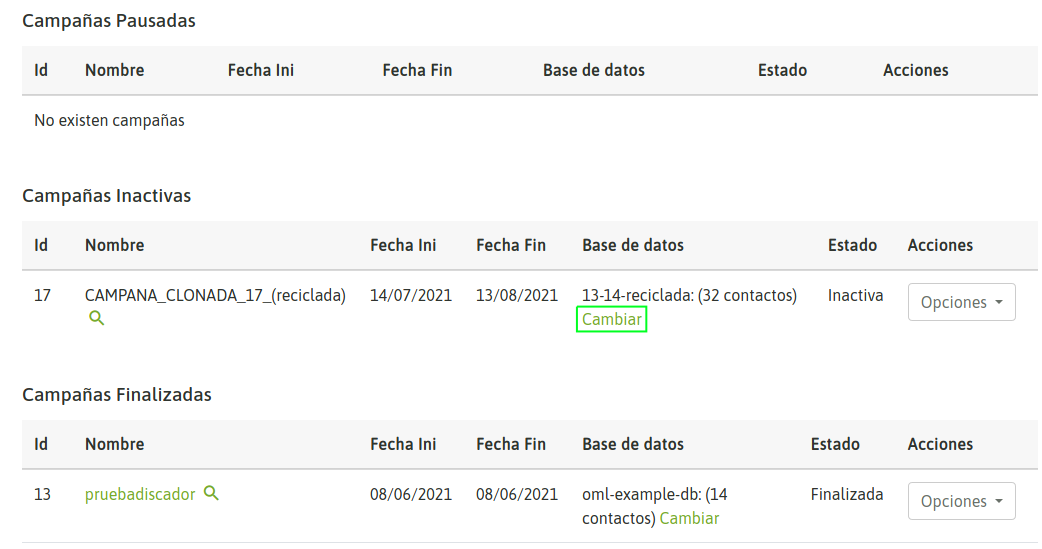
Figure 19: Switching Contact Database This will display a screen similar to the one shown in the following figure:

Figure 20: Contact database change form Important
The structure of the contact database that can be used as a replacement must be similar to the database that you want to replace. Once the replacement has been carried out, the campaign must be activated again.
Last updated